<selectid="findByCondition"parameterType="user"resultType="user"> select * from User <where> <iftest="id!=0"> and id=#{id} </if> <iftest="username!=null"> and username=#{username} </if> </where> </select>
choose、when、otherwise
1 2 3 4 5 6 7 8 9 10 11 12 13 14 15
<selectid="findActiveBlogLike" resultType="Blog"> SELECT * FROM BLOG WHERE state = ‘ACTIVE’ <choose> <whentest="title != null"> AND title like #{title} </when> <whentest="author != null and author.name != null"> AND author_name like #{author.name} </when> <otherwise> AND featured = 1 </otherwise> </choose> </select>
trim、where、set
使用where标签可以动态的舍去第一个and
1 2 3 4 5 6 7 8 9 10 11 12 13 14 15
<selectid="findActiveBlogLike" resultType="Blog"> SELECT * FROM BLOG <where> <iftest="state != null"> state = #{state} </if> <iftest="title != null"> AND title like #{title} </if> <iftest="author != null and author.name != null"> AND author_name like #{author.name} </if> </where> </select>
where 元素只会在子元素返回任何内容的情况下才插入 “WHERE” 子句。而且,若子句的开头为 “AND” 或 “OR”,where 元素也会将它们去除。
如果 where 元素与你期望的不太一样,你也可以通过自定义 trim 元素来定制 where 元素的功能。比如,和 where 元素等价的自定义 trim 元素为:
<selectid="selectPostIn"resultType="domain.blog.Post"> SELECT * FROM POST P WHERE ID in <foreachitem="item"index="index"collection="list" open="("separator=","close=")"> #{item} </foreach> </select>
<selectid="getById"resultMap="basePlusResultMap"> select s.ID,s.SKU_NAME,s.CATEGORY_ID,a.ID,a.ATTRIBUTE_NAME from t_shop_sku s,t_shop_attribute a where s.ID =a.SKU_ID and s.ID = #{id,jdbcType =BIGINT}; </select>
<selectid="getAttribute"resultMap="AttributeResultMap"> select a.ID,s.ATTRIBUTE_NAME from t_shop_attribute a where a.ID = #{skuId,jdbcType =BIGINT}; </select>
<selectid="getById"resultMap="BasePlusResultMap">
select s.ID,s.SKU_NAME,s.CATEGORY_ID
from t_shop_sku s
where s.ID = #{id,jdbcType =BIGINT};
</select>
//not proxy using publicclassotakuTest{ @Test //不使用代理直接获取。 publicvoidtest1(){ SellFigure s = new SellingImpl(); System.out.println("死宅1号买入价格:"+ s.SellingFigure("myself") );
} @Test //使用反射与配置文件调用bilibiliProxy的方法代理 publicvoidtest2()throws Exception{ //1. read properties by classloader and properties.class ClassLoader clz=otakuTest.class.getClassLoader(); InputStream clzs = clz.getSystemResourceAsStream("staticReflect.properties"); Properties pro = new Properties(); pro.load(clzs); //2. get property in properties file. String typo = pro.getProperty("Typo"); String methodname = pro.getProperty("methodName"); String classname ="staticProxy."+typo+"Proxy"; String implename = "staticProxy."+pro.getProperty("implName"); //3. load the .class into RAM for a class object Class clazz = Class.forName(classname); Class implclazz = Class.forName(implename); //4. create the instance and get the method Object obj = clazz.getConstructor(SellFigure.class).newInstance(implclazz.newInstance()); Method met = clazz.getDeclaredMethod(methodname,String.class); //5. setAccessible to true for the hidden private method and fields. met.setAccessible(true); //6. using the method.class 's method invoke to execute the method as a object file. Object a = met.invoke(obj,typo);
System.out.println(a);
// // SellFigure s = new bilibiliProxy(new SellingImpl()); // System.out.println("死宅2号买入价格:"+ s.SellingFigure("bilibili") ); } @Test //静态代理 使用acfun代理购买。 publicvoidtest3(){ SellFigure s = new acfunProxy(new SellingImpl()); System.out.println("死宅3号买入价格:"+ s.SellingFigure("acfun") ); }
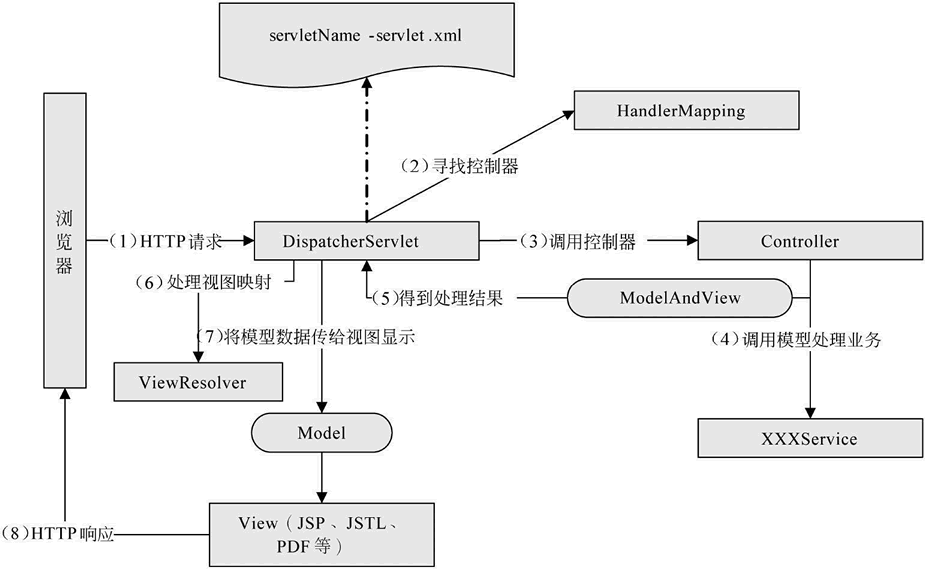
在 MyEclipse 中创建一个名为 springMVCDemo01 的 Web 应用,在 springMVCDemo01 的 lib 目录中添加 Spring MVC 程序所需要的 JAR 包,包括 Spring 的 4 个核心 JAR 包、commons-logging 的 JAR 包以及两个与 Web 相关的 JAR 包(spring-web-3.2.13.RELEASE.jar 和 spring-webmvc-3.2.13. RELEASE.jar)。
另外,在 Spring MVC 应用中使用注解时不要忘记添加 spring-aop-3.2.13.RELEASE.jar 包,添加后的 JAR 包如图 1 所示。
添加后的JAR包 图 1 添加后的 JAR 包 2)在 web.xml 文件中部署 DispatcherServlet
在开发 Spring MVC 应用时需要在 web.xml 中部署 DispatcherServlet,代码如下:
读作 “反转控制”,更好理解,不是什么技术,而是一种设计思想,就是将原本在程序中手动创建对象的控制权,交由Spring框架来管理。 正控:若要使用某个对象,需要自己去负责对象的创建 反控:若要使用某个对象,只需要从 Spring 容器中获取需要使用的对象,不关心对象的创建过程,也就是把创建对象的控制权反转给了Spring框架
好莱坞法则: Don’t call me ,I’ll call you
简而言之: spring 的IOC就是它负责了对象的创建的时机,你只需要在配置或者注解中将创建对象时的内容,其创建和调用都由spring 托管。 spring内由IOCcontainer容器实现。
ApplicationContext 是 BeanFactory 的子接口之一,换句话说:BeanFactory 是 Spring IoC 容器所定义的最底层接口,而 ApplicationContext 是其最高级接口之一,并对 BeanFactory 功能做了许多的扩展,所以在绝大部分的工作场景下,都会使用 ApplicationContext 作为 Spring IoC 容器。
【getBean】 对应了多个方法来获取配置给 Spring IoC 容器的 Bean。 ① 按照类型拿 bean: bean = (Bean) factory.getBean(Bean.class); 注意: 要求在 Spring 中只配置了一个这种类型的实例,否则报错。(如果有多个那 Spring 就懵了,不知道该获取哪一个) ② 按照 bean 的名字拿 bean: bean = (Bean) factory.getBean(“beanName”); 注意: 这种方法不太安全,IDE 不会检查其安全性(关联性) ③ 按照名字和类型拿 bean:(推荐) bean = (Bean) factory.getBean(“beanName”, Bean.class); 【isSingleton】 用于判断是否单例,如果判断为真,其意思是该 Bean 在容器中是作为一个唯一单例存在的。而【isPrototype】则相反,如果判断为真,意思是当你从容器中获取 Bean,容器就为你生成一个新的实例。 注意: 在默认情况下,【isSingleton】为 ture,而【isPrototype】为 false 关于 type 的匹配,这是一个按 Java 类型匹配的方式 【getAliases】方法是获取别名的方法 这就是 Spring IoC 最底层的设计,所有关于 Spring IoC 的容器将会遵守它所定义的方法。
这样就会使用 Application 的实现类 ClassPathXmlApplicationContext 去初始化 Spring IoC 容器,然后开发者就可以通过 IoC 容器来获取资源了啦!
关于 Spring Bean 的装配以及一些细节,会在下一篇文章中讲到 ApplicationContext 常见实现类:
1.ClassPathXmlApplicationContext: 读取classpath中的资源
1 2 3 4 5 6 7 8 9 10 11 12
ApplicationContext ctx = new ClassPathXmlApplicationContext("applicationContext.xml");
2:FileSystemXmlApplicationContext:-
//读取指定路径的资源

ApplicationContext ac = new FileSystemXmlApplicationContext("c:/applicationContext.xml");
//3.XmlWebApplicationContext:
//需要在Web的环境下才可以运行

XmlWebApplicationContext ac = new XmlWebApplicationContext(); // 这时并没有初始化容器
ac.setServletContext(servletContext); // 需要指定ServletContext对象
ac.setConfigLocation("/WEB-INF/applicationContext.xml"); // 指定配置文件路径,开头的斜线表示Web应用的根目录
ac.refresh(); // 初始化容器
BeanFactory 和 ApplicationContext 的区别:
BeanFactory: 是Spring中最底层的接口,只提供了最简单的IoC功能,负责配置,创建和管理bean。 在应用中,一般不使用 BeanFactory,而推荐使用ApplicationContext(应用上下文),原因如下。 ApplicationContext: 1.继承了 BeanFactory,拥有了基本的 IoC 功能; 2.除此之外,ApplicationContext 还提供了以下功能: ① 支持国际化; ② 支持消息机制; ③ 支持统一的资源加载; ④ 支持AOP功能; Spring IoC 的容器的初始化和依赖注入
虽然 Spring IoC 容器的生成十分的复杂,但是大体了解一下 Spring IoC 初始化的过程还是必要的。这对于理解 Spring 的一系列行为是很有帮助的。
注意: Bean 的定义和初始化在 Spring IoC 容器是两大步骤,它是先定义,然后初始化和依赖注入的。
Bean 的定义分为 3 步: 1.Resource 定位 Spring IoC 容器先根据开发者的配置,进行资源的定位,在 Spring 的开发中,通过 XML 或者注解都是十分常见的方式,定位的内容是由开发者提供的。 2.BeanDefinition 的载入 这个时候只是将 Resource 定位到的信息,保存到 Bean 定义(BeanDefinition)中,此时并不会创建 Bean 的实例 3.BeanDefinition 的注册 这个过程就是将 BeanDefinition 的信息发布到 Spring IoC 容器中 注意:此时仍然没有对应的 Bean 的实例。 做完了以上 3 步,Bean 就在 Spring IoC 容器中被定义了,而没有被初始化,更没有完成依赖注入,也就是没有注入其配置的资源给 Bean,那么它还不能完全使用。
对于初始化和依赖注入,Spring Bean 还有一个配置选项——【lazy-init】,其含义就是是否初始化 Spring Bean。在没有任何配置的情况下,它的默认值为 default,实际值为 false,也就是 Spring IoC 默认会自动初始化 Bean。如果将其设置为 true,那么只有当我们使用 Spring IoC 容器的 getBean 方法获取它时,它才会进行 Bean 的初始化,完成依赖注入。